
Search
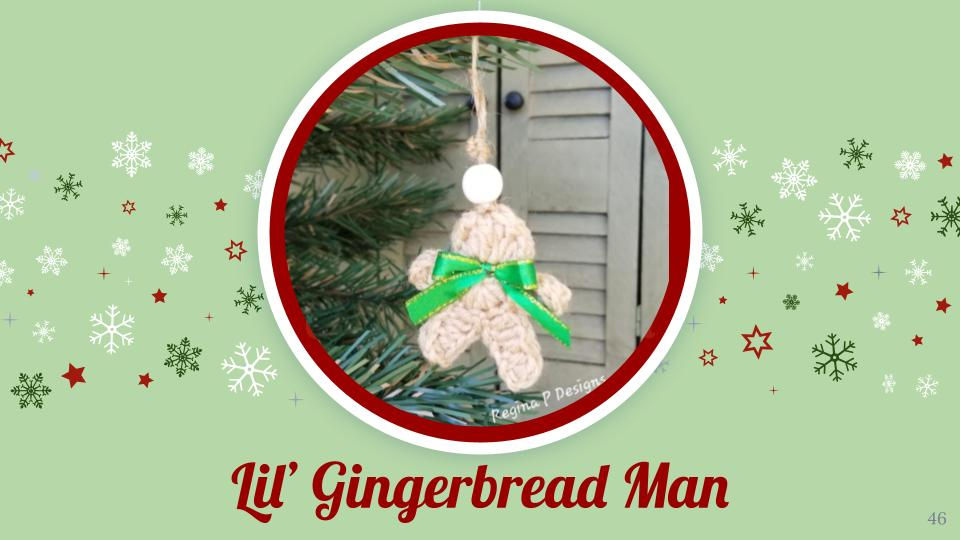
Wee Gingerbread Ornament Pattern
Updated: Jan 26, 2023
Let me tell you about Country Crafters. This group has been around about as long as I have. Members, like my mom & older sisters, have come and gone over the years while I dreamed of the day I could be a part of it too.
The group holds one big all weekend event every year. A few years ago the crocheter of the group retired and I finally got my chance to become a member. I was amazed at how smoothly the whole thing goes my first year in attendance, as a creator that is. These amazing folks have trialed and errored for years to get all the details just right and I am beyond blessed to be able to come in when I did.
To get to my point.... One of the requirements is a plethora of different Christmas Ornaments. This has been tricky for me. I really don't like using other people's ideas or creating the newest fad items. I have yet to create a single gnome. However, I seem to struggle to come up with anything that hasn't already been done before when it comes to Christmas items.
As this year's show approached, and time was running out to make, I spent a day just brainstorming with yarn and hook in hand and came up with a couple new cuties. I'll have to let you know how they do after the show in November, but they have been a big hit with my testers so far.
If you decide to make up some of these please let me know how they do for you too!
If you have any questions about this pattern or any of the other patterns from Regina P Designs, or want to show off your finished projects with this pattern, please join our Facebook group.

The ad free PDF download of this pattern, available for purchase now, includes a bonus pattern for the cute little leaf to create the alternative design pictured here.
Here's what you'll need to get started...........
Materials:
Red Heart Classic yarn in Cafe Latte(approx. 22 yds)
Red Heart Super Saver in white for the frosting & mouth(a few yds)
G(4.25 mm) Hook
Scissors
Needle
Fiber Fill Stuffing
Small Pom-Poms(optional)
Abbreviations(US Terms):
SK = Skip
sts = Stitches
ST = Stitch
SL= Slip Stitch
CH = Chain
SC = Single Crochet
HDC = Half Double Crochet
BLO = Back Loop Only
DEC = Decrease
MR = Magic Ring
NOTES:
Finished item should measure approx. 3” across. Hide your tails inside & be careful not to over stuff.
To begin create a MR with Cafe Latte
ROUND 1: CH 1(does not count as a ST), place 10 SC in the MR, SL to your first SC to connect(10)
ROUND 2: CH 1(does not count as a ST), place (HDC & SC) in each ST, SL to your first ST to connect(20)
ROUND 3: CH 1(does not count as a ST), (SC, CH2/SK1) 10 times, SL to your first ST to connect(30)
Change to White
ROUND 4: CH 1(does not count as a ST), repeat(SC, SC/CH1/SC in the skipped ST on ROUND 2) 10 times, SL to your first ST to connect(40)

(Arrow shows where to place the “SC/CH1/SC”)
Change to Cafe Latte, cut & tie off your white
ROUND 5: CH 1(does not count as a ST), repeat(SC, SK1, place 3 SC in the CH SP, SK 1) 10 times, SL to your first ST to connect(40)

(arrow shows where to “place 3 SC in the CH SP”)

Stop and sew on your face. Add buttons for the eyes & a white mouth. Feel free to add a small red pom pom nose too if you like or leave the face off & make a cute cookie, get creative!
ROUND 6: CH 1(does not count as a ST), work in the BLO for this entire round, (SC 3 sts, SC DEC) 8 times, SL to your first ST to connect(32)
ROUND 7: CH 1(does not count as a ST), (SC 2 sts, SC DEC) 8 times, SL to your first ST to connect(24)
ROUND 8: CH 1(does not count as a ST), (SC, SC DEC) 8 times, SL to the next ST to connect(16)
Add a small amount of stuffing.
ROUND 9: CH 1(does not count as a ST), SC DEC 8 times, SL to the next ST to connect(8)

Cut leaving a long enough tail to sew your opening shut, tie off, sew shut, & weave in your end.

Attach your hanger to the top through round 5 or attach a pin or a magnet to the back instead of a hanger. I used Jute Twine but feel free to use whatever you like. Leave him as is or add a cute little bow. Make him yours!

BEFORE YOU GO, PLEASE GO ADD A FAVORITE HEART TO THIS PATTERN ON RAVELRY!

This pattern is
available for purchase
or
in my Ravelry Store HERE
For just $1.99
Looking for more Ornaments? Check out my E-Book!!


DON'T FORGET to check out this month's
©Copyright 2022, Regina P Designs All Rights Reserved. All Content Copyright and other rights reserved by Regina P Designs. No Content May Be Duplicated Without Express Written Consent.
By using any Regina P Designs patterns, you agree to the terms of use:
All Regina P Designs Patterns are for personal use only
It is prohibited to: reproduce, copy, publish(in any Form including video) or distribute this pattern, its parts or photos in any way or form, including translations into foreign languages.
You are free to do as you wish with the finished products made from these patterns with the agreement that Regina P Designs will be credited for the pattern itself.


Comentarios